코드 전문
import ComposableArchitecture
import SwiftUI

private let readMe = """
  This application demonstrates how to make use of SwiftUI's `refreshable` API in the Composable \
  Architecture. Use the "-" and "+" buttons to count up and down, and then pull down to request \
  a fact about that number.

  There is a discardable task that is returned from the store's `.send` method representing any \
  effects kicked off by the reducer. You can `await` this task using its `.finish` method, which \
  will suspend while the effects remain in flight. This suspension communicates to SwiftUI that \
  you are currently fetching data so that it knows to continue showing the loading indicator.
  """

@Reducer
struct Refreshable {
  @ObservableState
  struct State: Equatable {
    var count = 0
    var fact: String?
  }

  enum Action {
    case cancelButtonTapped
    case decrementButtonTapped
    case factResponse(Result<String, Error>)
    case incrementButtonTapped
    case refresh
  }

  @Dependency(\.factClient) var factClient
  private enum CancelID { case factRequest }

  var body: some Reducer<State, Action> {
    Reduce { state, action in
      switch action {
      case .cancelButtonTapped:
        return .cancel(id: CancelID.factRequest)

      case .decrementButtonTapped:
        state.count -= 1
        return .none

      case let .factResponse(.success(fact)):
        state.fact = fact
        return .none

      case .factResponse(.failure):
        // NB: This is where you could do some error handling.
        return .none

      case .incrementButtonTapped:
        state.count += 1
        return .none

      case .refresh:
        state.fact = nil
        return .run { [count = state.count] send in
          await send(
            .factResponse(Result { try await self.factClient.fetch(count) }),
            animation: .default
          )
        }
        .cancellable(id: CancelID.factRequest)
      }
    }
  }
}

struct RefreshableView: View {
  let store: StoreOf<Refreshable>
  @State var isLoading = false

  var body: some View {
    List {
      Section {
        AboutView(readMe: readMe)
      }

      HStack {
        Button {
          store.send(.decrementButtonTapped)
        } label: {
          Image(systemName: "minus")
        }

        Text("\(store.count)")
          .monospacedDigit()

        Button {
          store.send(.incrementButtonTapped)
        } label: {
          Image(systemName: "plus")
        }
      }
      .frame(maxWidth: .infinity)
      .buttonStyle(.borderless)

      if let fact = store.fact {
        Text(fact)
          .bold()
      }
      if self.isLoading {
        Button("Cancel") {
          store.send(.cancelButtonTapped, animation: .default)
        }
      }
    }
    .refreshable {
      isLoading = true
      defer { isLoading = false }
      await store.send(.refresh).finish()
    }
  }
}

#Preview {
  RefreshableView(
    store: Store(initialState: Refreshable.State()) {
      Refreshable()
    }
  )
}
리드미 해석
This application demonstrates how to make use of SwiftUI's `refreshable` API in the Composable Architecture. Use the "-" and "+" buttons to count up and down, and then pull down to request a fact about that number.
There is a discardable task that is returned from the store's `.send` method representing any effects kicked off by the reducer. You can `await` this task using its `.finish` method, which will suspend while the effects remain in flight. This suspension communicates to SwiftUI that you are currently fetching data so that it knows to continue showing the loading indicator.
이 애플리케이션은 컴포저블 아키텍처에서 SwiftUI의 '새로고침 가능' API를 사용하는 방법을 보여줍니다. “-” 및 “+” 버튼을 사용하여 위아래로 카운트한 다음 아래로 당겨 해당 숫자에 대한 사실을 요청합니다.
store의 `.send` 메서드에서 리듀서가 시작한 모든 효과를 나타내는 폐기 가능한 작업이 있습니다. 이 작업은 '.finish' 메서드를 사용하여 `대기`할 수 있으며, 이 경우 이펙트가 실행되는 동안 일시 중단됩니다. 이 일시 중단은 현재 데이터를 가져오고 있다는 것을 SwiftUI에 전달하여 prgoress indicator를 계속 표시하도록 알립니다.
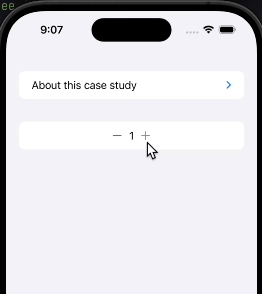
동작화면
.refreshable
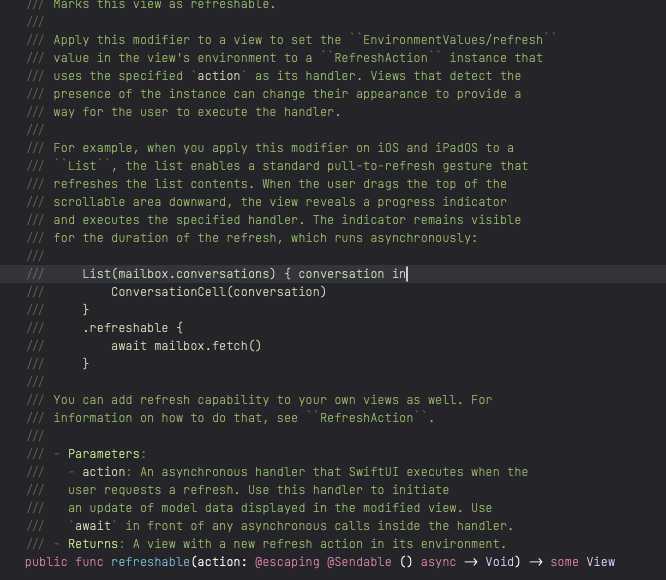
이 modifier는 이 뷰를 새로 고칠 수 있도록 표시합니다.
뷰에 이 modifier를 적용하여, 뷰의 환경에서 EnvironmentValues/refresh 값을 지정된 action을 핸들러로 사용하는 RefreshAction 인스턴스로 설정합니다. 해당 인스턴스의 존재를 감지하는 뷰는 외관을 변경하여 사용자가 핸들러를 실행할 수 있는 방법을 제공할 수 있습니다.
예를 들어, iOS 및 iPadOS에서 List에 이 modifier를 적용하면 목록이 표시됩니다. 이 목록은 목록 내용을 새로 고칠 수 있는 표준 pull-to-refresh 제스처를 활성화합니다. 사용자가 스크롤 가능한 영역의 맨 위를 아래로 드래그하면 뷰가 진행 표시기를 드러내고 지정된 핸들러를 실행합니다. 표시기는 새로 고침이 비동기적으로 실행되므로 새로 고침이 진행되는 동안 계속해서 보입니다.
by chatGPT 3.5
실행 순서 분석
  var body: some View {
  // Some View Code...
     if let fact = store.fact { // 4️⃣
        Text(fact)
          .bold()
      }
      if self.isLoading { // 2️⃣, 6️⃣
        Button("Cancel") {
          store.send(.cancelButtonTapped, animation: .default)
        }
      }
    }
    .refreshable {
      isLoading = true // 1️⃣
      defer { isLoading = false } // 5️⃣
      await store.send(.refresh).finish() // 3️⃣
    }
1. 사용자가 refresh 를 요청합니다.
2. view에 @state로 선언되어있는 isLoading 의 내부 변수를 변경해줍니다. (사실 이부분은 store의 state에 있는게 더 바람직 합니다.)
3. store가 .refresh를 종료하기 전 까지 await합니다.
4. store.fact값이 nil이 아니게 된다면, fact를 표시해줍니다.
5. defer로 인해 isLoading을 종료해줍니다.
6. cancel Button 표시를 종료합니다.
캔슬 버튼 동작 순서
먼저 factResponse를 부르기 위해 API통신을 합니다. 그 때 통신하는 cancellableID를 등록해 줍니다. 만약 통신 중간에 api요청을 취소하고 싶다면, cacelbutton을 누릅니다. 그리고 cancelID를 통해 취소를 하면 됩니다.
 var body: some Reducer<State, Action> {
    Reduce { state, action in
      switch action {
      case .cancelButtonTapped:
        return .cancel(id: CancelID.factRequest)

      case .refresh:
        state.fact = nil
        return .run { [count = state.count] send in
          await send(
            .factResponse(Result { try await self.factClient.fetch(count) }),
            animation: .default
          )
        }
        .cancellable(id: CancelID.factRequest)
      }
    }
  }

게시물은 TCA 라이브러리의 CaseStudies를 직접 작성해보고 어떻게 작동하는지에 대해서 공부하기 위해서 작성했습니다.
'Swift > TCA' 카테고리의 다른 글
| [TCA] Effect.swift 공식문서 음미하기 (0) | 2024.08.24 |
|---|---|
| [TCA] day 13 타이머 (Effects- Timer) (0) | 2024.05.08 |
| [TCA] day 10 long living Effect (publisher Effect and async/await effect) (0) | 2024.05.05 |
| [TCA] day 10 Effect 취소 (TCA @Shared, Sheet) (0) | 2024.05.03 |
| [TCA] TCA 1.10 이후부터의 Shared State의 initRule (0) | 2024.05.02 |


