Velog 에서 최적화로 볼 수 있습니다.
현재 상황: Part2의 문제점
과거 Navigation Architeture는 SwiftUI에서 UIKit ViewController를 끌어오는 방식으로 아키텍쳐를 작성했습니다. 하지만 이것이 TCA와 SwiftUI가 바라는 방식은 아니라고 생각했습니다. 그 이유는 다음과 같습니다.
- SwiftUI View는 class가 아닌 struct
- SwiftUI뷰는 class가 아닌 struct입니다. struct의 가장 큰 특징중 하나는 상속이 되지 않는다는 점 입니다. 그렇기 때문에 뷰를 만들거나 혹은 만들어진 뷰를 땡겨쓸 때 구체타입에 대해서 알아야 합니다. 이를 보충 설명하면 UIViewController만 있으면 되었던 UIKit과 달리 some View라는 구체 타입을 알아야 합니다.(물론 any View를 통한 그리는 뷰를 묶을 수도 있습니다.)
- TCA의 StackNavigation
- TCA Stack Based Navigation Examples를 확인하면 Path를 switch를 통해 분리했습니다. 그리고 case에서 적절한 View를 initialize했습니다. 이렇게 하게 된다면 TCA내부에서
dependency(\.dismiss) var dismiss를 활용할 수 있습니다.
- TCA Stack Based Navigation Examples를 확인하면 Path를 switch를 통해 분리했습니다. 그리고 case에서 적절한 View를 initialize했습니다. 이렇게 하게 된다면 TCA내부에서
사실 위와 같은 문제점들이 있었습니다. TCA가 설계한 그 그대로 StackNavigation을 구현하는데 StackNavigation을 좀 더 가독성 있게 만들어보자 라는 취지에서 Navigation에 대한 설계를 다시 해봤습니다.
SingleTone Navigation Publisher를 통한 Navigation 구현
SwiftUI 에서 Navigation을 할 수 있는 View
SwiftUI에서 Navigation 하기 위해서는 뷰의 구체타입을 알아야 합니다. 이 말은 화면을 push하는 객체는 어떤 뷰에 대한 정확한 타입을 알아야 합니다. 뷰를 전환하는 객체는 두가지가 될 수 있습니다.
- 가장 상위의 navigationStack을 갖고 있는 Root view
- Navigation Destination을 활용하여 View 전환
- 상위는 아니지만 Push된 View
- Push된 뷰는
.navigationDestination(isPresented:, destination: )을 통해서 다음 화면으로 전환할 수 있습니다. - Push된 뷰는
NavigationLink(destination:, label:)를 통해서 화면 전환이 가능합니다.
- Push된 뷰는
View생성자를 하위 View에 두는게 과연 옳을까...?
Coordinator패턴이 도입된 이유는 ViewController 즉 뷰에서 화면전환 로직을 coordinator로 전환하는 것으로 부터 시작했습니다. 그렇기 떄문에 Root에 하위 뷰에서 생성자를 통해서 View에서 바로 생성하는 것 보다는 가장 상위 NavigationStack이 Destination View를 생성하는 방향으로 진행하자고 생각했습니다.
NavigationLink {
SomeView() //🤔🤔
} label: {
Text("Push Some View")
}
Publisher와 NavigationStack을 통한 구현
구현 순서는 다음과 같습니다.
Path destination enum생성(enum Reducer이고, wildCard에 View 의 Reducer가 들어 갑니다.
@Reducer(state: .equatable, action: .equatable) // or @Reducer
enum NavigationDestinationPath {
  case second(SecondReducer)
  case third(ThirdReducer)
}- NavigationDesinationPath Reucer의 State의 값을 방출할 Publisher를 생성합니다.
final class NavigationDestinationPublisher {
  static let shared = NavigationDestinationPublisher()

  private init() {} // 싱글톤이라 priviate init
  private var _publisher: PassthroughSubject<NavigationDestinationPath.State, Never> = .init()

  func publisher() -> AnyPublisher<NavigationDestinationPath.State, Never> {
    return _publisher.eraseToAnyPublisher()
  }

  func push(navigationDestination val: NavigationDestinationPath.State) {
    _publisher.send(val)
  }
}
- NavigationStack을 가질 Reducer에 설정을 해줍니다.
Top Reducer에State및Action에Path추가해줌View가 생성될 시Publisher을sink함sink된 값을 통해서state.path에 적절한 값을append
@Reducer
// 첫번째 뷰 리듀서
struct FirstReducer {
  @ObservableState
  struct State: Equatable {
    // ... View State properties ....
    var onAppear: Bool = false
    var path: StackState<NavigationDestinationPath.State> = .init([])
  }

  enum Action: Equatable {
    //... View Aciton Case ...
    case onAppear(Bool)
    case path(StackActionOf<NavigationDestinationPath>) // ✅ navigation Stack을 위해 사용됨
    case push(NavigationDestinationPath.State) // ✅ sink하는 Publisher를 통해 사용될 예정
  }

  enum CancelID { // ✅ 만약 onAppear이 두번 불리면 이전 Publisher sink하는 로직을 취소 하기 위해 사용됨
    case publisher
  }

  var body: some ReducerOf<Self> {
    Reduce { state, action in
      switch action {
     /// .. body Code ...
      case .path(_):
        return .none

      case .onAppear(_):
        return .publisher {
        // ✅ view가 보이면 SingleTone Publisher 를 sink합니다.
        // 또한 이벤트 발생시 .push(path) Event를 발생시킵니다.
          NavigationDestinationPublisher.shared.publisher()
            .map{ state in .push(state)}
        }.cancellable(id: CancelID.publisher, cancelInFlight: true)

      // ✅ state.path 에 방출된 값을 저장합니다.
      case let .push(pathState):
        state.path.append(pathState)
        return .none
      }
    }
    .forEach(\.path, action: \.path)
  }
}
- NavigationStack생성
// 첫번째 뷰
struct FirstView: View {
  @Bindable
  var store: StoreOf<FirstReducer>
  var body: some View {
    NavigationStack(path: $store.scope(state: \.path, action: \.path)) {
      VStack(spacing: 0) {
        Text("UIHostinhController를 통해 생성된 뷰")
        Button {
          store.send(.navigationSecondScreen)
        } label: {
          Text("Go SecondScreen")
        }

        Button {
          store.send(.navigationThirdScreen)
        } label: {
          Text("Go ThirdScreen")
        }
      }
      .onAppear{
        store.send(.onAppear(true))
      }
    } destination: { store in
      switch store.case {
      case let .second(store):
        SecondView(store: store)
      case let .third(store) :
        ThirdView(store: store)
      }
    }
  }
}
Publisher를 통한 화면 이동은 어떻게?
NaviagtionPublisehr를 통해서 화면을 이동하면 됩니다. NaviagtionPublisher 는 Shared의 singleTone객체가 있기 때문에 이 객체를 통해서 함수를 실행하면 됩니다. push함수의 경우 NavigationDestination의 State을 전달하면 됩니다.
/// ReducerCode

     // Reducer code ...
 var body: some ReducerOf<Self> {
    Reduce { state, action in
      switch action {
      case .navigationSecondScreen:
        let secondReducerState = SecondReducer.State()
        NavigationDestinationPublisher.shared.push(navigationDestination: .second(secondReducerState))
        return .none

     // code ...
Bulider분리
만약 reducer body내부에서 객체를 생성하는것에 대한 책임을 분리하고 싶다면 다음과 같이 객체 책임을 분리할 수 있습니다.
struct FirstReducerNavigationBuilder: Equatable {
  init() {}
  func makeSecondReducerState() -> SecondReducer.State {
    return .init()
  }
}

// reducer code...
      case .navigationSecondScreen:
        let state = state.builder.makeSecondReducerState()
        NavigationDestinationPublisher.shared.push(navigationDestination: .second(state))
구조도
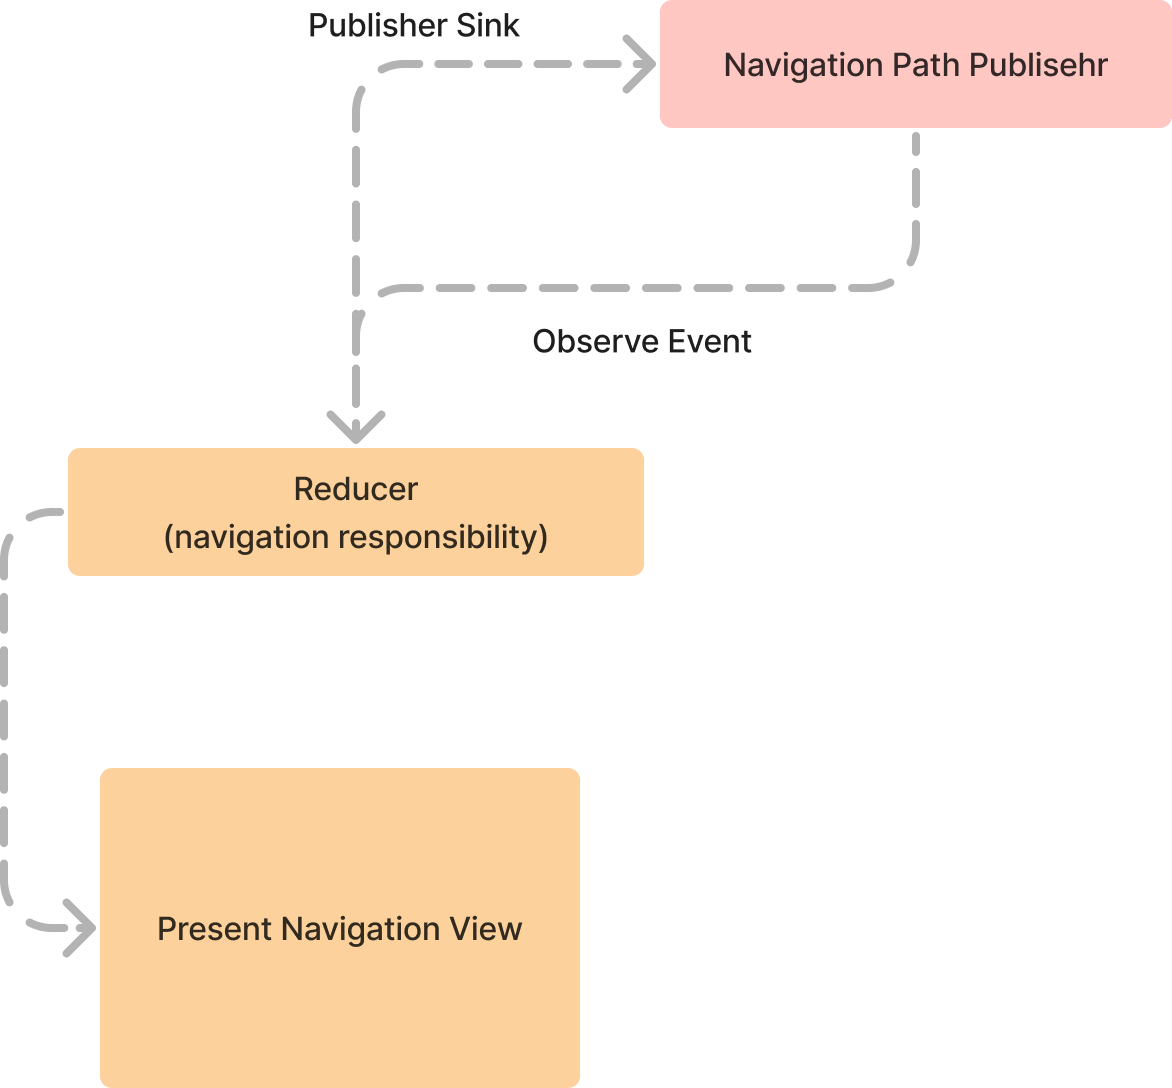
최상단 리듀서(NavigationStack, NavigationDestination뷰를 표시하기 위해 사용되는 리듀서)와 Publisher의 관계 입니다.
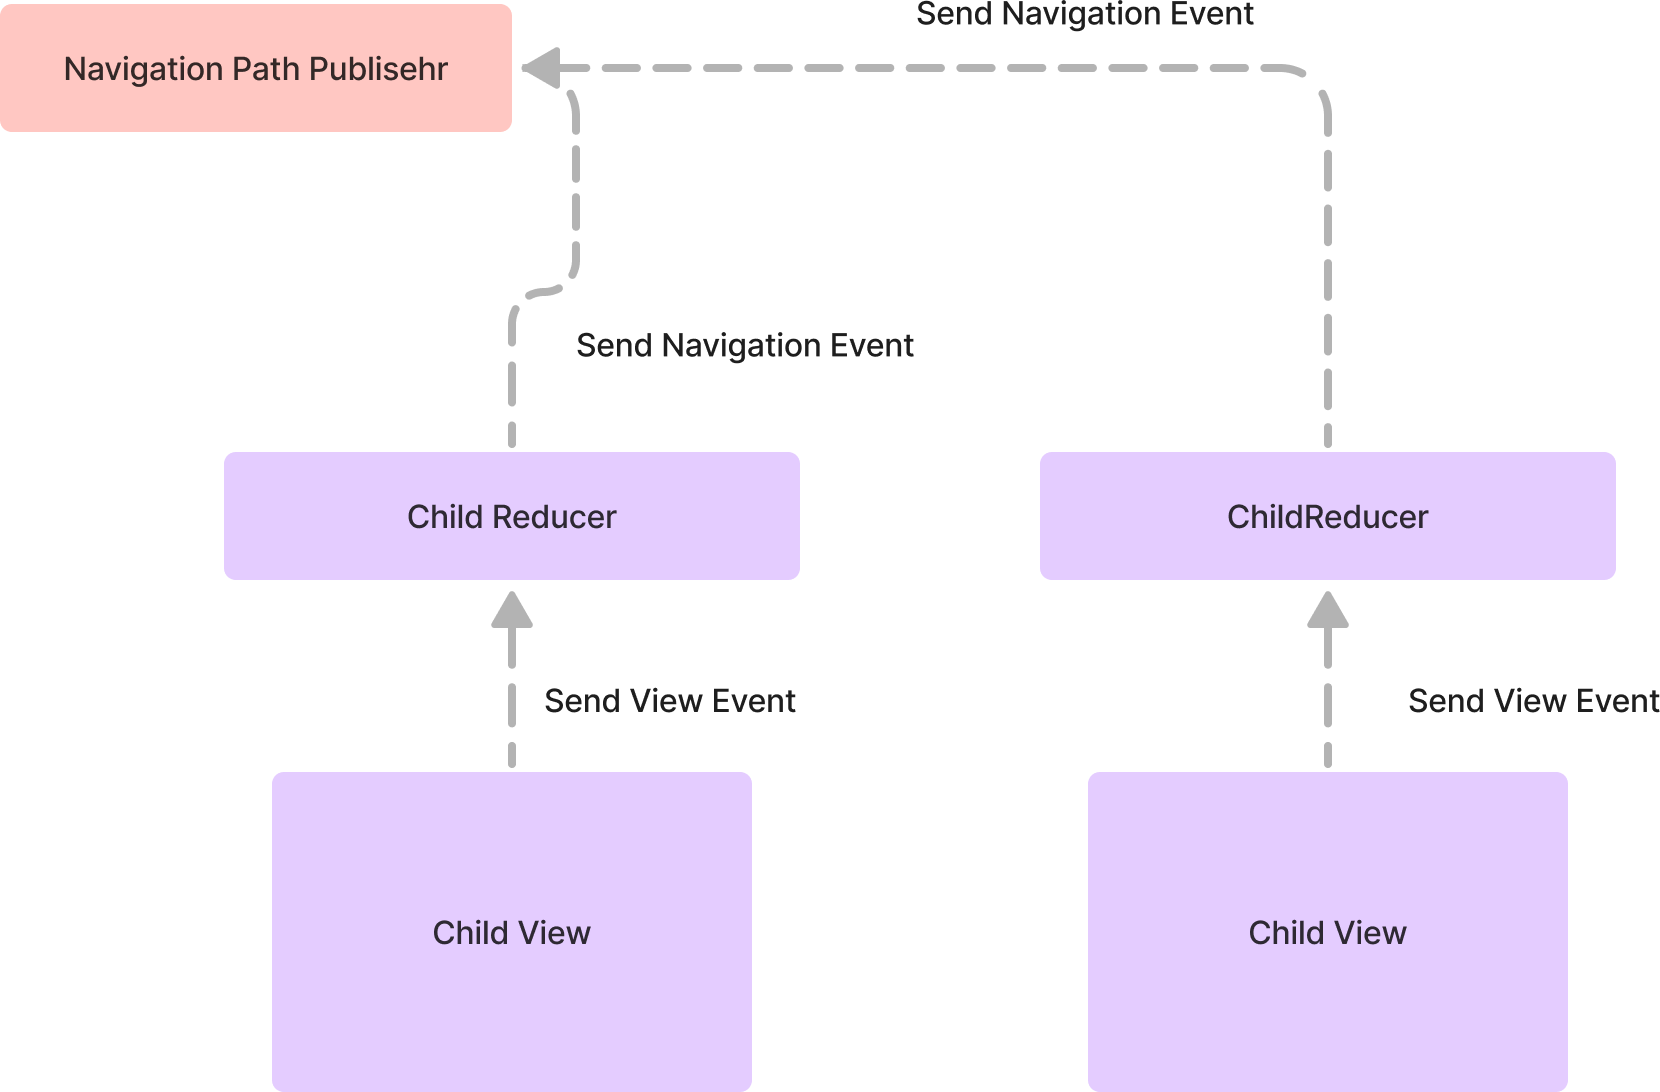
최상단이 아닌 하위 뷰와 Publisher와 관계 입니다.
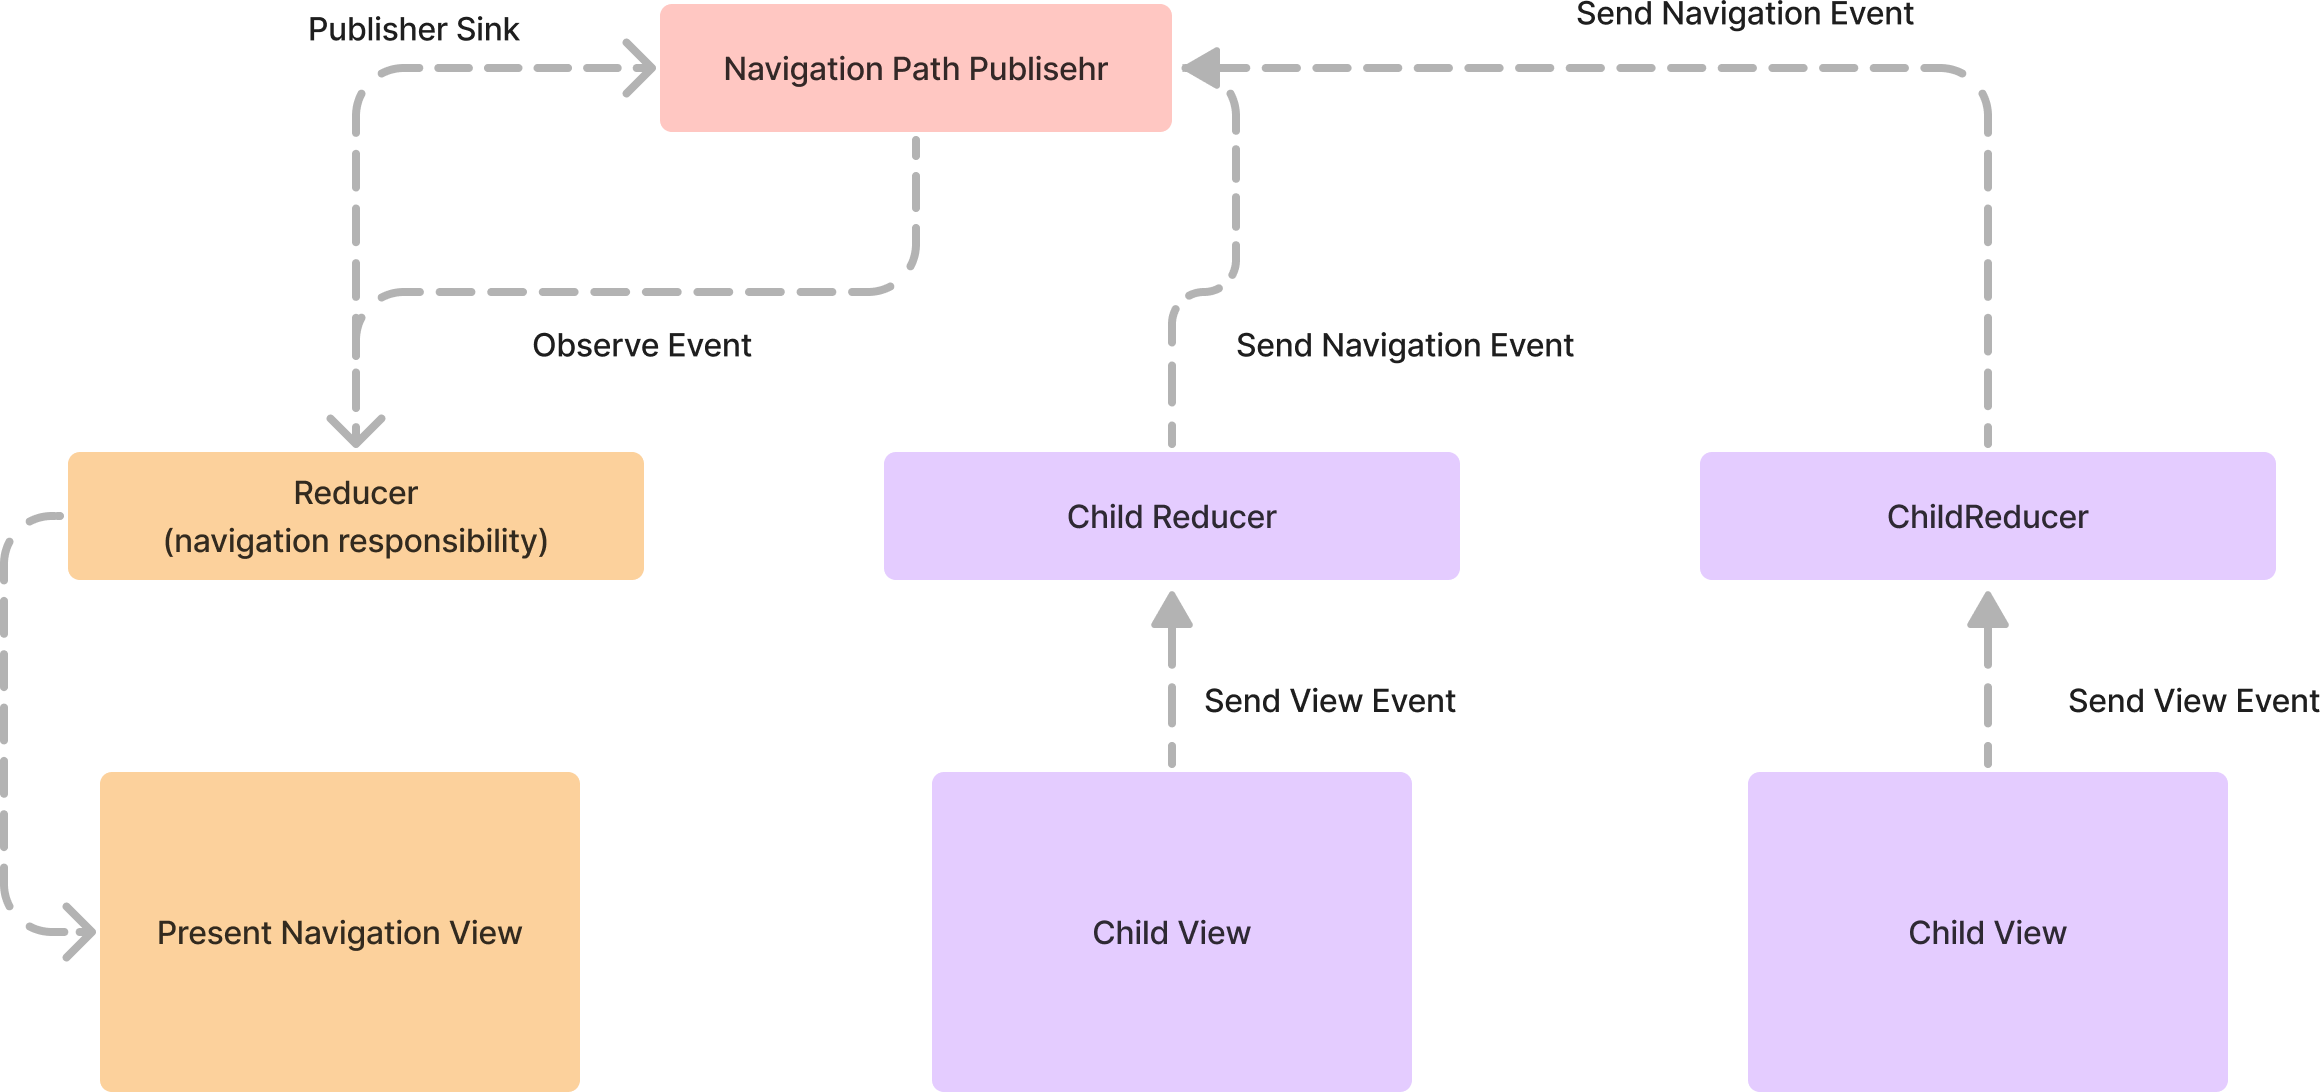
둘을 합친 전체 구조도 입니다.
장단점
Pros
- TCA 스럽다 SwiftUI스럽다
- SwiftUI가 제공하는 API와 TCA Examples를 Pubilsher로 래핑한 것이기에 나쁘지 않은 코드라고 느낍니다.
- 직관적이며 협업 용이
- 코드들이 정말 읽기 편해졌습니다. 각각 하는 일을 분리할 수 있게 객체지향적으로 코드를 작성했습니다. Bulider, Router, View, Publisher가 각자의 역할만 하는 아키텍쳐를 구현하였습니다. 이를 통해서 버그픽스나 혹은 코드리뷰할 때 어떤 역할을 하는지를 네이밍을 통해 유추할 수 있었다며 칭찬을 들었습니다.
cons
- enum의 Desitnation이 추가될 때 마다 destination의 switch문에서 swift View를 추가 해야함
- destination을 추가할 때 마다 navigationStack의 destination에 case 를 통한 구체 View를 생성해줘야 합니다. 저는 사실 이것을 "추가에는 열려있고 수정에는 닫혀있는 코드"가 아닌 것 같아 좋은 코드인지 계속 의심하고 있습니다.
전체코드
누를 시 깃허브로 이동합니다.
'프로젝트 > 수수-경조사비 관리 서비스' 카테고리의 다른 글
| [SUSU] TCA로 여러개의 병렬로 Network요청 보내고 한번에 View Update 하기 (Using Isolated Task Manager) (1) | 2024.08.24 |
|---|---|
| [SUSU] SwiftUI로 Custom Apple Login Button 만들기 (0) | 2024.06.28 |
| [SUSU] 수수앱에서 Navigation 방식을 정의하기 part 2 (TCA With Navigation) (1) | 2024.06.15 |
| [SUSU] 수수앱에서 Navigation 방식을 정의하기 part 1 (TCA With Navigation) (0) | 2024.06.15 |
| [수수-경조사비 관리 서비스] 수수의 Custom Numeric Animation View (0) | 2024.06.01 |


